Common Computer Issues: Screen Tearing
Screen tearing is one of those irritating problems that can detract significantly from your computing experience, particularly if you enjoy gaming or watching high-definition videos. This phenomenon occurs when the display hardware displays pieces of multiple frames in a single screen draw, causing a mismatch that results in lines or tears across the screen. Such issues can break the immersion of a game or distract you while watching a movie.
In this guide, we’ll dive deep into the world of screen tearing, understanding what it is, why it happens, and, most importantly, how you can fix it. Whether you’re a gamer, a professional video editor, or just someone annoyed by the glitches on your screen, this post aims to provide you with practical, actionable solutions. We’ll explore everything from simple adjustments to more advanced troubleshooting methods, ensuring you have all the tools you need to enhance your visual experience.
What is screen tearing?

Screen tearing is a visual artifact in video display where a display device shows information from multiple frames in a single screen draw. This issue occurs when the video feed to the device isn’t in sync with the display’s refresh rate. Essentially, the display, be it a monitor or a TV, is caught between two frames as it refreshes. Instead of a smooth, cohesive image, users see disjointed lines or a horizontal split on the screen, which can be particularly noticeable and distracting during fast-moving scenes in games or videos.
Understanding the Mechanics Behind Screen Tearing
- Frame Rate: This is the frequency at which consecutive images called frames appear on a display. Measured in frames per second (fps), this should ideally match the refresh rate of the monitor for a smooth display.
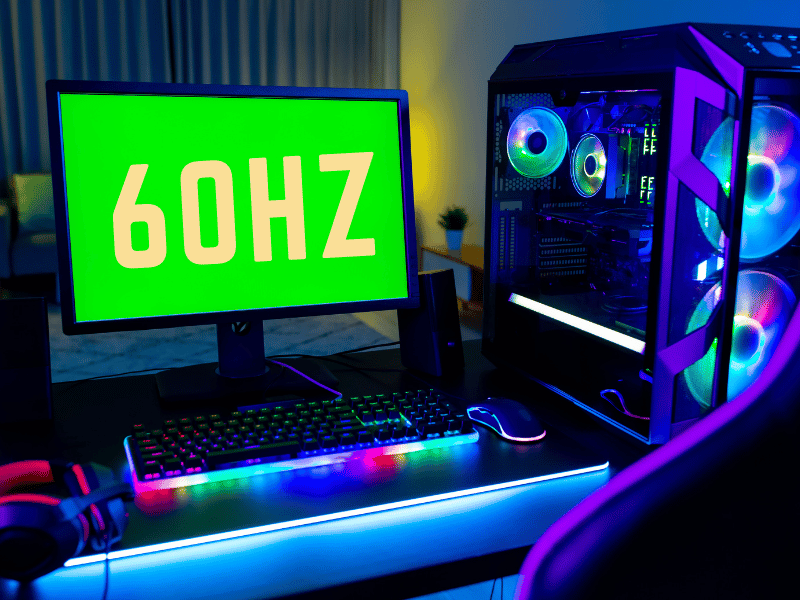
- Refresh Rate: The number of times the monitor updates with new information per second, measured in hertz (Hz). Common refresh rates include 60Hz, 120Hz, and 144Hz.
Visual Examples
To better identify screen tearing, consider this scenario: You’re watching a fast-paced action movie, and during a high-speed car chase, you notice a horizontal line distorting the image briefly as the scene shifts rapidly. This disruption is screen tearing.
Understanding screen tearing is crucial for both troubleshooting and preventing it, especially for users engaged in activities where visual fluidity is key, such as gaming or high-quality video streaming.
Computer Repair and Services
Free estimate. Same-day services – Safemode Computer Service
Causes of Screen Tearing
Understanding the root causes of screen tearing is essential to effectively address and prevent this issue. Several factors can contribute to screen tearing, including mismatched frame rates and refresh rates, hardware limitations, and incorrect settings. Let’s explore these causes in detail.
1. Mismatch Between Display’s Refresh Rate and Frame Rate
One of the primary causes of screen tearing is the mismatch between the frame rate of the video content and the refresh rate of the display. When the graphics card sends frames to the monitor faster or slower than the monitor can refresh, it results in the display showing parts of multiple frames at once.
- Frame Rate: This is how many frames per second (fps) your graphics card can output. For example, if your graphics card outputs at 100 fps but your monitor refreshes at 60Hz, some frames will overlap, causing screen tearing.
- Refresh Rate: This is how many times per second your monitor can refresh its image, measured in hertz (Hz). Common refresh rates include 60Hz, 120Hz, and 144Hz. An inconsistency between these rates and the frame rate can lead to screen tearing.
2. Hardware Limitations
Outdated or underperforming hardware can also lead to screen tearing. This includes both the graphics card and the monitor. If your hardware cannot keep up with the demands of the software or content you are viewing, screen tearing is a likely outcome.
- Graphics Card: Older graphics cards may not be able to handle high frame rates efficiently, leading to screen tearing during high-performance tasks like gaming or video editing.
- Monitor: Monitors with lower refresh rates (e.g., 60Hz) are more prone to screen tearing when paired with high frame rate outputs. Upgrading to a monitor with a higher refresh rate can mitigate this issue.
3. Incorrect Settings in Graphics Software
Incorrect configuration of graphics settings can exacerbate screen tearing. This includes settings within your operating system, the game you’re playing, or the video playback software you’re using.
- V-Sync Settings: Vertical synchronization (V-Sync) can help match the frame rate with the refresh rate. However, if it’s turned off or not configured properly, it can lead to screen tearing.
- Graphics Driver Settings: Outdated or incorrectly configured graphics drivers can cause mismatches between the frame rate and refresh rate. Keeping your drivers up-to-date and properly configured is essential.
Diagnosing Screen Tearing
Identifying screen tearing is the first step towards fixing it. Diagnosing this issue involves a combination of visual checks, utilizing diagnostic tools, and understanding your hardware and software settings. Here’s a detailed guide on how to diagnose screen tearing effectively.
1. Visual Identification
The most straightforward method to identify screen tearing is through careful observation. Look for the following visual indicators while watching videos or playing games:
- Horizontal Lines: Noticeable horizontal lines that split the screen, especially during fast movements.
- Disjointed Images: Portions of the screen that seem out of sync with the rest, creating a fragmented appearance.
- Sudden Jumps: Abrupt changes or jumps in the image where part of the frame appears to lag behind or ahead.
2. Using Diagnostic Tools
Several software tools can help you confirm the presence of screen tearing and provide insights into its severity and causes. Here are some popular tools:
- FRAPS: A benchmarking and screen capture tool that can display frame rate information.
- MSI Afterburner: is a hardware monitoring tool that provides detailed information on your system’s performance, including frame rates.
- V-Sync Tester: Online tools and websites that help test the synchronization between your frame rate and refresh rate.
Step-by-Step Guide to Using MSI Afterburner:
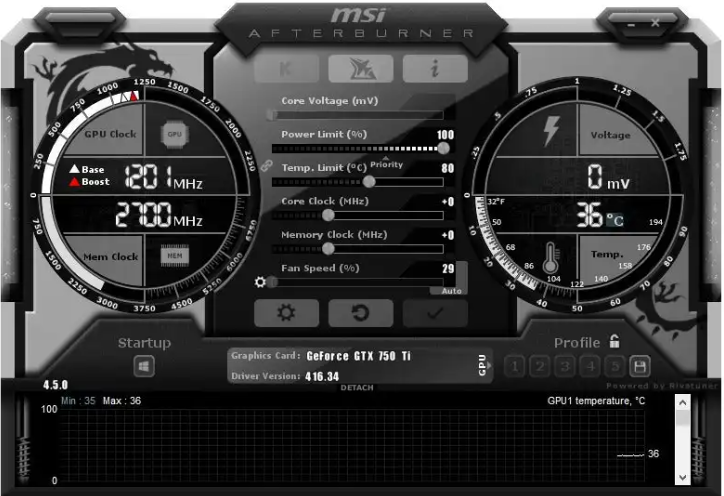
- Download and Install: Download MSI Afterburner from the official website and install it on your system.
- Run the Program: Open MSI Afterburner and go to the monitoring tab.
- Enable Frame Rate Monitoring: Ensure that the frame rate is being monitored and displayed on the screen.
- Play a Game or Video: Run a game or play a video while keeping an eye on the frame rate data provided by MSI Afterburner.
- Look for Discrepancies: Compare the frame rate with your monitor’s refresh rate to identify any inconsistencies.
3. Checking Hardware and Software Settings
Understanding and optimizing your hardware and software settings can also help diagnose screen tearing:
- Graphics Card Settings: Access your graphics card’s control panel (NVIDIA Control Panel, AMD Radeon Settings) and check for any misconfigurations.
- Monitor Settings: Ensure your monitor is set to its maximum refresh rate in the display settings of your operating system.
- Game/Software Settings: Verify that the settings within the game or software you are using are optimized to match your hardware capabilities.
Common Solutions to Prevent Screen Tearing
Once you’ve diagnosed screen tearing, the next step is to implement solutions to prevent it. These solutions range from adjusting software settings to upgrading hardware. Below are some of the most effective methods to prevent screen tearing.
1. Enable V-Sync (Vertical Synchronization)
V-Sync synchronizes the frame rate of the game or video with the monitor’s refresh rate, preventing multiple frames from being displayed at once.
How to Enable V-Sync:
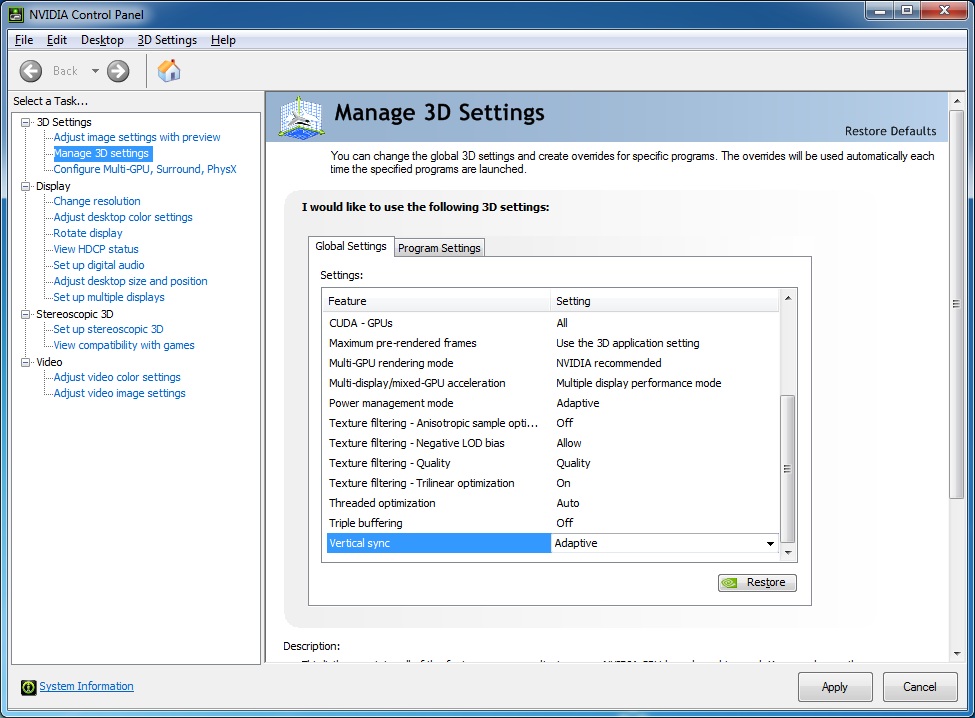
- NVIDIA Control Panel: Open NVIDIA Control Panel > Manage 3D Settings > Global Settings or Program Settings > Vertical Sync > On.
- AMD Radeon Settings: Open Radeon Settings > Gaming > Global Settings > Wait for Vertical Refresh > Always On.
Pros and Cons:
- Pros: Reduces screen tearing by syncing frame rate with refresh rate.
- Cons: Can introduce input lag and lower frame rates, which may be noticeable in competitive gaming.
2. Use Adaptive Sync Technologies
Adaptive sync technologies like NVIDIA G-Sync and AMD FreeSync dynamically adjust the monitor’s refresh rate to match the frame rate output of the graphics card.
- NVIDIA G-Sync: Requires a compatible NVIDIA graphics card and G-Sync monitor.
- AMD FreeSync: Requires a compatible AMD graphics card and FreeSync monitor.
Benefits:
- Eliminates screen tearing without the input lag associated with V-Sync.
- Provides a smoother and more responsive experience in games.
3. Cap the Frame Rate
Capping the frame rate to match the monitor’s refresh rate can also help prevent screen tearing. This can be done using software settings or third-party tools.
- In-Game Settings: Most modern games have an option to cap the frame rate.
- Third-Party Tools: Software like RivaTuner can be used to cap the frame rate.
- Example: If your monitor refresh rate is 60Hz, cap your game’s frame rate to 60 fps.
4. Update Graphics Drivers
Outdated graphics drivers can cause various performance issues, including screen tearing. Keeping your drivers up-to-date ensures optimal performance and compatibility with the latest games and software.
How to Update:
- NVIDIA Users: Use GeForce Experience or download drivers from the NVIDIA website.
- AMD Users: Use Radeon Software or download drivers from the AMD website.
5. Adjust Monitor Refresh Rate
Ensure your monitor is set to its maximum refresh rate. Lower refresh rates can exacerbate screen tearing issues.
How to Adjust:
- Windows: Settings > System > Display > Advanced display settings > Display adapter properties > Monitor tab > Screen refresh rate.
- Mac: System Preferences > Displays > Display tab > Refresh Rate.
Step-by-Step Fixes for Screen Tearing
Addressing screen tearing often requires a methodical approach, implementing solutions one step at a time. Here’s a detailed guide to step-by-step fixes you can apply to eliminate screen tearing effectively.
1. Enable V-Sync
Step-by-Step Instructions for NVIDIA Users:
- Open NVIDIA Control Panel:
– Right-click on the desktop and select “NVIDIA Control Panel.”
- Navigate to 3D Settings:
– Go to “Manage 3D settings” on the left sidebar.
- Enable V-Sync:
– In the “Global Settings” or “Program Settings” tab, find “Vertical sync” and set it to “On.”
- Apply Changes:
– Click “Apply” to save the settings.
Step-by-Step Instructions for AMD Users:
- Open Radeon Settings:
– Right-click on the desktop and select “AMD Radeon Settings.”
- Go to Gaming:
– Select the “Gaming” tab, then choose “Global Settings.”
- Enable V-Sync:
– Under “Wait for Vertical Refresh,” set it to “Always On.”
- Apply Changes:
– Click “Apply” to save the settings.
2. Use Adaptive Sync Technologies
Step-by-Step for NVIDIA G-Sync:
- Check Compatibility:
– Ensure your monitor supports G-Sync and you have an NVIDIA graphics card.
- Open NVIDIA Control Panel:
– Right-click on the desktop and select “NVIDIA Control Panel.”
- Enable G-Sync:
– Go to “Set up G-Sync” on the left sidebar.
– Check the box for “Enable G-Sync, G-Sync Compatible.”
- Apply Changes:
– Click “Apply” to save the settings.
Step-by-Step for AMD FreeSync:
- Check Compatibility:
– Ensure your monitor supports FreeSync and you have an AMD graphics card.
- Open Radeon Settings:
– Right-click on the desktop and select “AMD Radeon Settings.”
- Enable FreeSync:
– Go to “Display” tab.
– Toggle the “AMD FreeSync” switch to “On.”
- Apply Changes:
– Click “Apply” to save the settings.
3. Cap the Frame Rate
Using In-Game Settings:
- Open Game Settings:
– Access the settings menu of the game you’re playing.
- Find Frame Rate Cap Option:
– Look for an option like “Frame Rate Cap” or “Max FPS.”
- Set to Match Refresh Rate:
– Set the cap to match your monitor’s refresh rate (e.g., 60 fps for a 60Hz monitor).
- Apply Changes:
– Save the settings.
Using RivaTuner:
- Download and Install RivaTuner:
– Download RivaTuner Statistics Server from the official website and install it.
- Open RivaTuner:
– Launch RivaTuner Statistics Server.
- **Set Frame Rate Limit:
– In the main window, find the “Framerate limit” box and enter your desired frame rate (e.g., 60 fps).
- Apply Changes:
– Save the settings.
4. Update Graphics Drivers
For NVIDIA Users:
- Open GeForce Experience:
– Launch GeForce Experience from your Start menu or system tray.
- Check for Updates:
– Go to the “Drivers” tab and click “Check for updates.”
- Download and Install:
– If updates are available, click “Download” and follow the prompts to install them.
For AMD Users:
- Open Radeon Software:
– Launch Radeon Software from your Start menu or system tray.
- Check for Updates:
– Go to the “Updates” tab and click “Check for updates.”
- Download and Install:
– If updates are available, click “Download” and follow the prompts to install them.
5. Adjust Monitor Refresh Rate
For Windows Users:
- Open Display Settings:
– Right-click on the desktop and select “Display settings.”
- Advanced Display Settings:
– Scroll down and click “Advanced display settings.”
- Display Adapter Properties:
– Click “Display adapter properties for Display 1.”
- Monitor Tab:
– Go to the “Monitor” tab and select the highest available refresh rate from the drop-down menu.
- Apply Changes:
– Click “Apply” to save the settings.
For Mac Users:
- Open System Preferences:
– Click the Apple menu and select “System Preferences.”
- Displays:
– Click on “Displays.”
- Refresh Rate:
– Under the “Display” tab, choose the highest refresh rate available from the “Refresh Rate” drop-down menu.
- Apply Changes:
– The changes should apply automatically.
How SafeMode Computer Service Can Help
![]()
When dealing with persistent screen tearing issues, sometimes the best course of action is to seek professional assistance. SafeMode Computer Service offers specialized support to diagnose and resolve screen tearing and other common computer problems. Here’s how SafeMode can help:
1. Expert Diagnosis
- In-Depth Analysis: SafeMode’s team of experts can conduct a thorough analysis of your computer system to identify the root cause of screen tearing. This includes examining hardware compatibility, software settings, and driver issues.
- Advanced Tools: Utilizing advanced diagnostic tools, SafeMode can pinpoint problems that might not be easily detectable through basic troubleshooting.
2. Customized Solutions
- Tailored Recommendations: Based on the diagnosis, SafeMode provides customized solutions tailored to your specific needs. This may include configuring V-Sync, enabling adaptive sync technologies, or capping the frame rate.
- Hardware Upgrades: If necessary, SafeMode can recommend and install hardware upgrades, such as a new graphics card or a monitor compatible with adaptive sync technologies, to enhance your system’s performance and prevent screen tearing.
- Software Optimization: SafeMode can optimize your system’s software settings to ensure they are aligned with best practices for preventing screen tearing. This includes updating drivers, configuring game settings, and adjusting monitor settings.
3. Ongoing Support
- Continuous Monitoring: SafeMode offers ongoing support and monitoring to ensure that your system continues to perform optimally. They can detect and address any new issues that arise, preventing screen tearing from recurring.
- Regular Maintenance: Regular maintenance services from SafeMode include updating software, cleaning hardware components, and ensuring that all system settings are optimized for performance.
4. Comprehensive Services
- Wide Range of Services: SafeMode offers a wide range of computer services beyond screen tearing issues, including virus removal, data recovery, and network setup.
- Convenient Service Options: Whether you need in-home support, remote assistance, or service at one of their locations, SafeMode provides flexible options to meet your needs.
Conclusion
Screen tearing can disrupt your computing experience, but understanding its causes and solutions can help you maintain a smooth display performance. Here’s a quick recap:
- Understanding Screen Tearing: It occurs due to mismatched frame rates and refresh rates, leading to visual distortions.
- Common Causes: Issues include outdated drivers, hardware limitations, and improper settings.
- Symptoms and Signs: Look for visual disruptions like horizontal lines and image distortion.
- Step-by-Step Fixes:
- Enable V-Sync
- Use adaptive sync technologies (G-Sync, FreeSync)
- Cap the frame rate
- Update graphics drivers
- Adjust monitor refresh rate
- Professional Help: SafeMode Computer Service offers expert diagnosis, tailored solutions, and ongoing support to fix and prevent screen tearing.
By applying these strategies and seeking professional assistance when necessary, you can significantly reduce or eliminate screen tearing, ensuring a smoother and more enjoyable computing experience.